Let’s start really simple and go from there. The Basic section will provide examples of things you can do with a Crumble with no additional components. In External Outputs we extend this with the use of an LED or two.
For each of these examples there will be an image of the code blocks and a video of the code running. To build the code, drag the items from the list on the left hand side onto the main section of the application. Make sure all the blocks connect together. To load and run the program on your Crumble click the green play icon in the top left.
On the Crumble there are two red LEDs which are used to show when the motor controller is active. We can use these to start coding straight away.
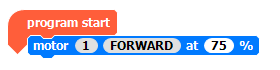
To recreate this; drag the “program start” block from the “Basics” list, then drag the “motor 1 STOP” block and snap it into place. Now click on the word “STOP” and it will change to “FORWARD”. It will default to 75% which is fine for what we need. Press the play button (top left) and see what happens, or watch the clip below.
Well, we have a light on; I’d call that progress! Now, let’s turn it off; drag in a “wait” block and another “motor” block as shown below. Don’t forget to press the play button to upload your code.
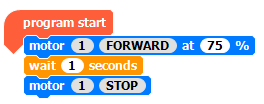
It went on, then off…. then stopped. This is because the code has run its course. The Crumble doesn’t restart the code when it gets to the end, it just follow the instructions we’ve given it.