At the weekend I took a 90 mile road trip north to Cambridge for the latest CamJam. As always lots to see and do, along with several purveyors of Pi related goodies, which may have been my wallets down fall. Amongst my stash of swag is a PiDuino from the SKPang stall, at £10 down from £18 it was rude not to!
The PiDuino is an add-on board to connect an Atmega328 to a Raspberry Pi via SPI and serial. The SPI is used to program the chip with your Arduino code and the serial (which can be disconnected) is there for communications between the devices.

A PiDuino
At the CamJam in July I had been shown an early version by David (whaleygeek) Whale who has provided not only software support for the Arduino code, but also a Python library to load the compiled firmware onto the chip at runtime (more on that later).
Soldering Iron at the Ready
The PiDuino comes in kit form so I had to get soldering first. The instructions are nice and clear, however I have asked SKPang if they could adjust the sequence of events to start with the lower profile components first. Starting with the jumper headers made the board unstable on the worktop.
After a couple of user errors (read twice, solder once!) the board powered up and away we went!
Getting Up and Running
The first thing I did was follow the instructions to install a modified version of avrdude from Gordon Henderson, and the Arduino IDE. In reality you only need to do this if you plan on putting together and compiling your own firmware for the ATmega on the Pi.
Enter stage left WhaleyGeek and his Python loader. Hats off to David on this one, I won’t go into details, just read his blog post about it.
It Lives!
Yup, it had to be done; Test_Blinky.py was run, the firmware loaded and the little red LED on the PiDuino winked at me. It’s amazing how satisfying a flashing LED can be.
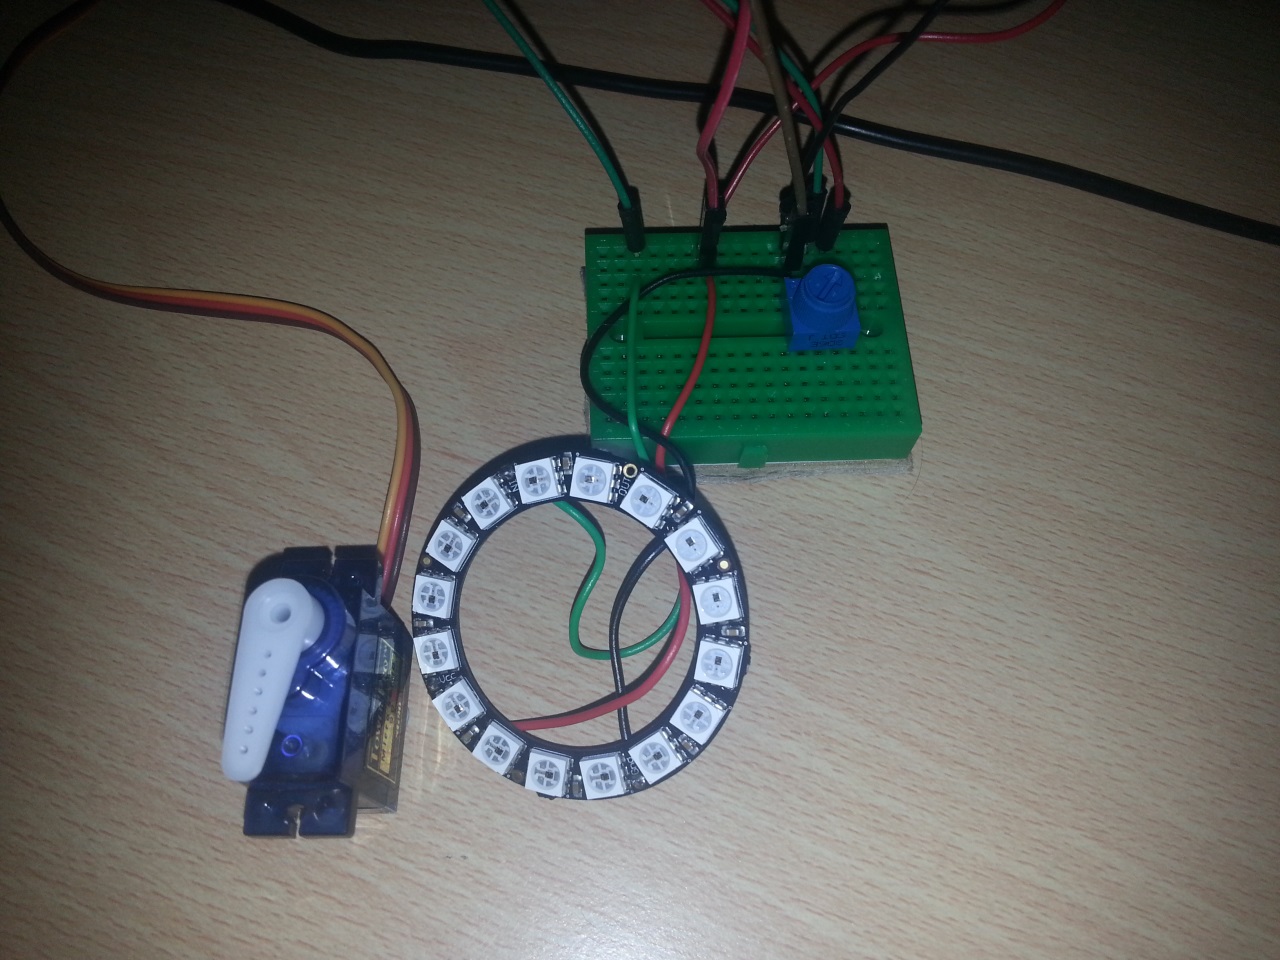
After this I downloaded Davids NeoPixel colour mixer code, wired up a 16 LED NeoPixel ring, tweaked the Python (24 NeoPixels down to 16) and ran the code. It worked great! The firmware that’s loaded is called CoPro and currently controls a set of NeoPixels, a servo and posts messages back when one of three analog inputs changes; all via serial comms.
Note: As I found out the PiDuino (understandably) draws current away from your Pi. Make sure your power supply is up to the job, the USB hub on my Dell monitor wasn’t and every time I inserted/removed/touched a wire it caused a Pi resetting brown out. A 2A power supply stabilised things nicely.
I also attached a 10k pot (variable resistor) I had kicking around in my kit. This allowed me to simulate one of the resistive strips on the demo program.
Time to Tinker
Once I knew it was all working was time to tinker. Using the demo program as a base I wrote a program to change the LED position on the Neopixel ring in step with the 10k pot; as it turns, the LED moves round the ring. Oh, and it randomly picks a colour from a pre-set list, for added blinkyness.
When I was happy with that I added a servo I had to hand, to try out the servo support in the CoPro firmware. Again this worked very nicely as you can see in the video below (apologies for the poor lighting, hopefully the YouTube enhancements have improved things).
There were a couple of things that tripped me up
- The neopixel command required a short pause after each pixel is sent
- Global variables are a pain in the bum
- The CoPro firmware pushes the current analogue value to the serial buffer when it changes. If nothing has changed since the last read you get back no values
The first I fixed in the copro.py class provided as the pause is already present if you provide multiple pixels. I include the tweaked copro.py and my source in this zip. I’ve not included all the rest of the PiDuino files as these are available from David’s blog post I mentioned earlier.
Here are some close ups of the wiring – A0 = 10k pot (3.3v), D9 = servo (5v), D10 = NeoPixel ring (5v)