When people work with a hardware device like a Raspberry Pi or an Arduino the first thing they usually do is write some code to make an LED blink on and off. It’s a simple and effective way of checking the device works as you expect it to.
In the last example the light came on, then went off. To keep this repeating we need to use a coding concept called a loop. Loops are used to tell the program to repeat a block of code; this can be for a set number of times, until something happens, or forever! For the rest of the examples in this section we need it to loop forever.
In the list find the “do forever” block and drag it onto the coding area and build the code shown below and run it.
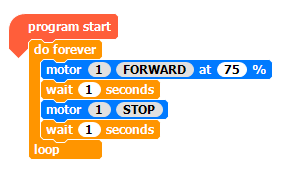
Hopefully your Crumble has behaved like the one in the clip. Now our code is turning on the LED, waiting a second, turning it off (motor STOP), waiting a second, then going back to the start of the “do forever” loop. Take a moment to tinker with the code; change the wait time by clicking on the number and increasing it to 2 or more. How about different wait times?
One LED is good, but two is better!
Admit it, you had the mee-maw mee-maw of police/ambulance sirens going in your head.
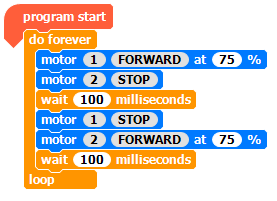
How about we make this faster? The “wait” command only takes whole numbers, so the code can’t wait less than a second. If you have a look on the “Control” list and you will find a “wait 100 milliseconds” block. Replace the “seconds” wait blocks with a “milliseconds” block like this.